Bamboo Bandit - Electric Long Board
In the fall of 2015, I decided I wanted an electric skateboard for commuting purposes. Specifically, I wanted a Boosted Board (something about that orange and black aesthetic). The problem was that, at the time, I didn't have the $1200 required to buy said Boosted Board. What I did have was free time and an office full of tools. I decided to make my own.
Required Resources: 50 hours, $300
Size: 36" x 10" x 4" Tall
Materials: Bamboo Ply, Aluminum Jessup Grip Tape, Belt Pinion, Drive Belt. LiPo Battery, Brushless Motor, Electric Speed Controller, Remote.
Finish: Minwax Natural Stain, Semi-gloss Polyurethane Aerosol
Tools: Band Saw, Orbital Sander, Laser Cutter, Water Jet, Press Brake
New techniques: Drive Train to Deck
The Drive Train
While not a particularly complicated system, the drive train for the electric skateboard did require some engineering. It need to be compact, light, and adjustable. There were plenty of off the shelf options, but I wanted to give myself the challenge of designing, fabricating and troubleshooting the drive train myself.

It's a deceptively simple image, but the design delineated in this image took around 25 hours. Well, maybe not 25 hours just in design implementation. There was an incredible amount of background information I had to get a handle on before I could even start on the design. First was motor choice. There are a lot of parameters to nail down when specing out a motor: Brushed or brushless, inrunner or outrunner, sensored or unsensored, output power, efficiency, operating voltage range, speed controller compatibility, voltage constant, mounting style, etc., etc. etc. I actually ended up reading a book, Motors for Makers, which gave me enough of a base to confidently choose the motor I ended up going using, a 50mm BLDC Outrunner with a max 2kW output and a 270 kV voltage constant. I completely understand if this is all gibberish to you. Before this, it was to me as well.

The next part of the design was the motor mount. Once I had chosen the motor, I modeled it in CAD and started to fit it into a truck/wheel assembly. I chose Caliper II long board trucks because the hanger (the axle mount) had a square profile. This would make a good clamping location for a mount. I designed a two piece clamp that fit snugly around the hanger profile and fastened with 2 SHCSs. Attached to this mount I designed an adjustable bracket that would mount the motor. The bracket had to have a minimum amount of adjustability to accommodate for belt tensioning. Finally, I chose and ordered a pulley pinion that mounted to the motor shaft. The size of the pinion I chose was determined by calculating the appropriate gearing ratio between the motor output and the wheel. The calculation took into account input/output power, rider weight and the range of desired speeds.

The last action to complete the mechanical drive assembly was to modify the wheel with a custom pulley gear. I chose to use Orangatang's "IN HEAT" wheels because there was a lot of room in the body of the wheel to drill attachment holes. Also, I was quite fond of the color. Attached to the inner wall of the wheel, I designed and water jet a large pulley that would be driven by a pulley belt. That 2 part pulley gear was bolted through the wheel and secured on the outer face of the wheel with bolts through a retaining clamp. I made a jig to drill the through holes for the mounting hardware as it was critical to get the pulley as close to centered as possible. Otherwise, the pulley would be eccentric and the belt would gain and lose tension as it rotated at hundreds of RPM. This would not only be bad for the long term durability of the belt, but would also risk complete de-tensioning and the belt jumping with a rider on board.
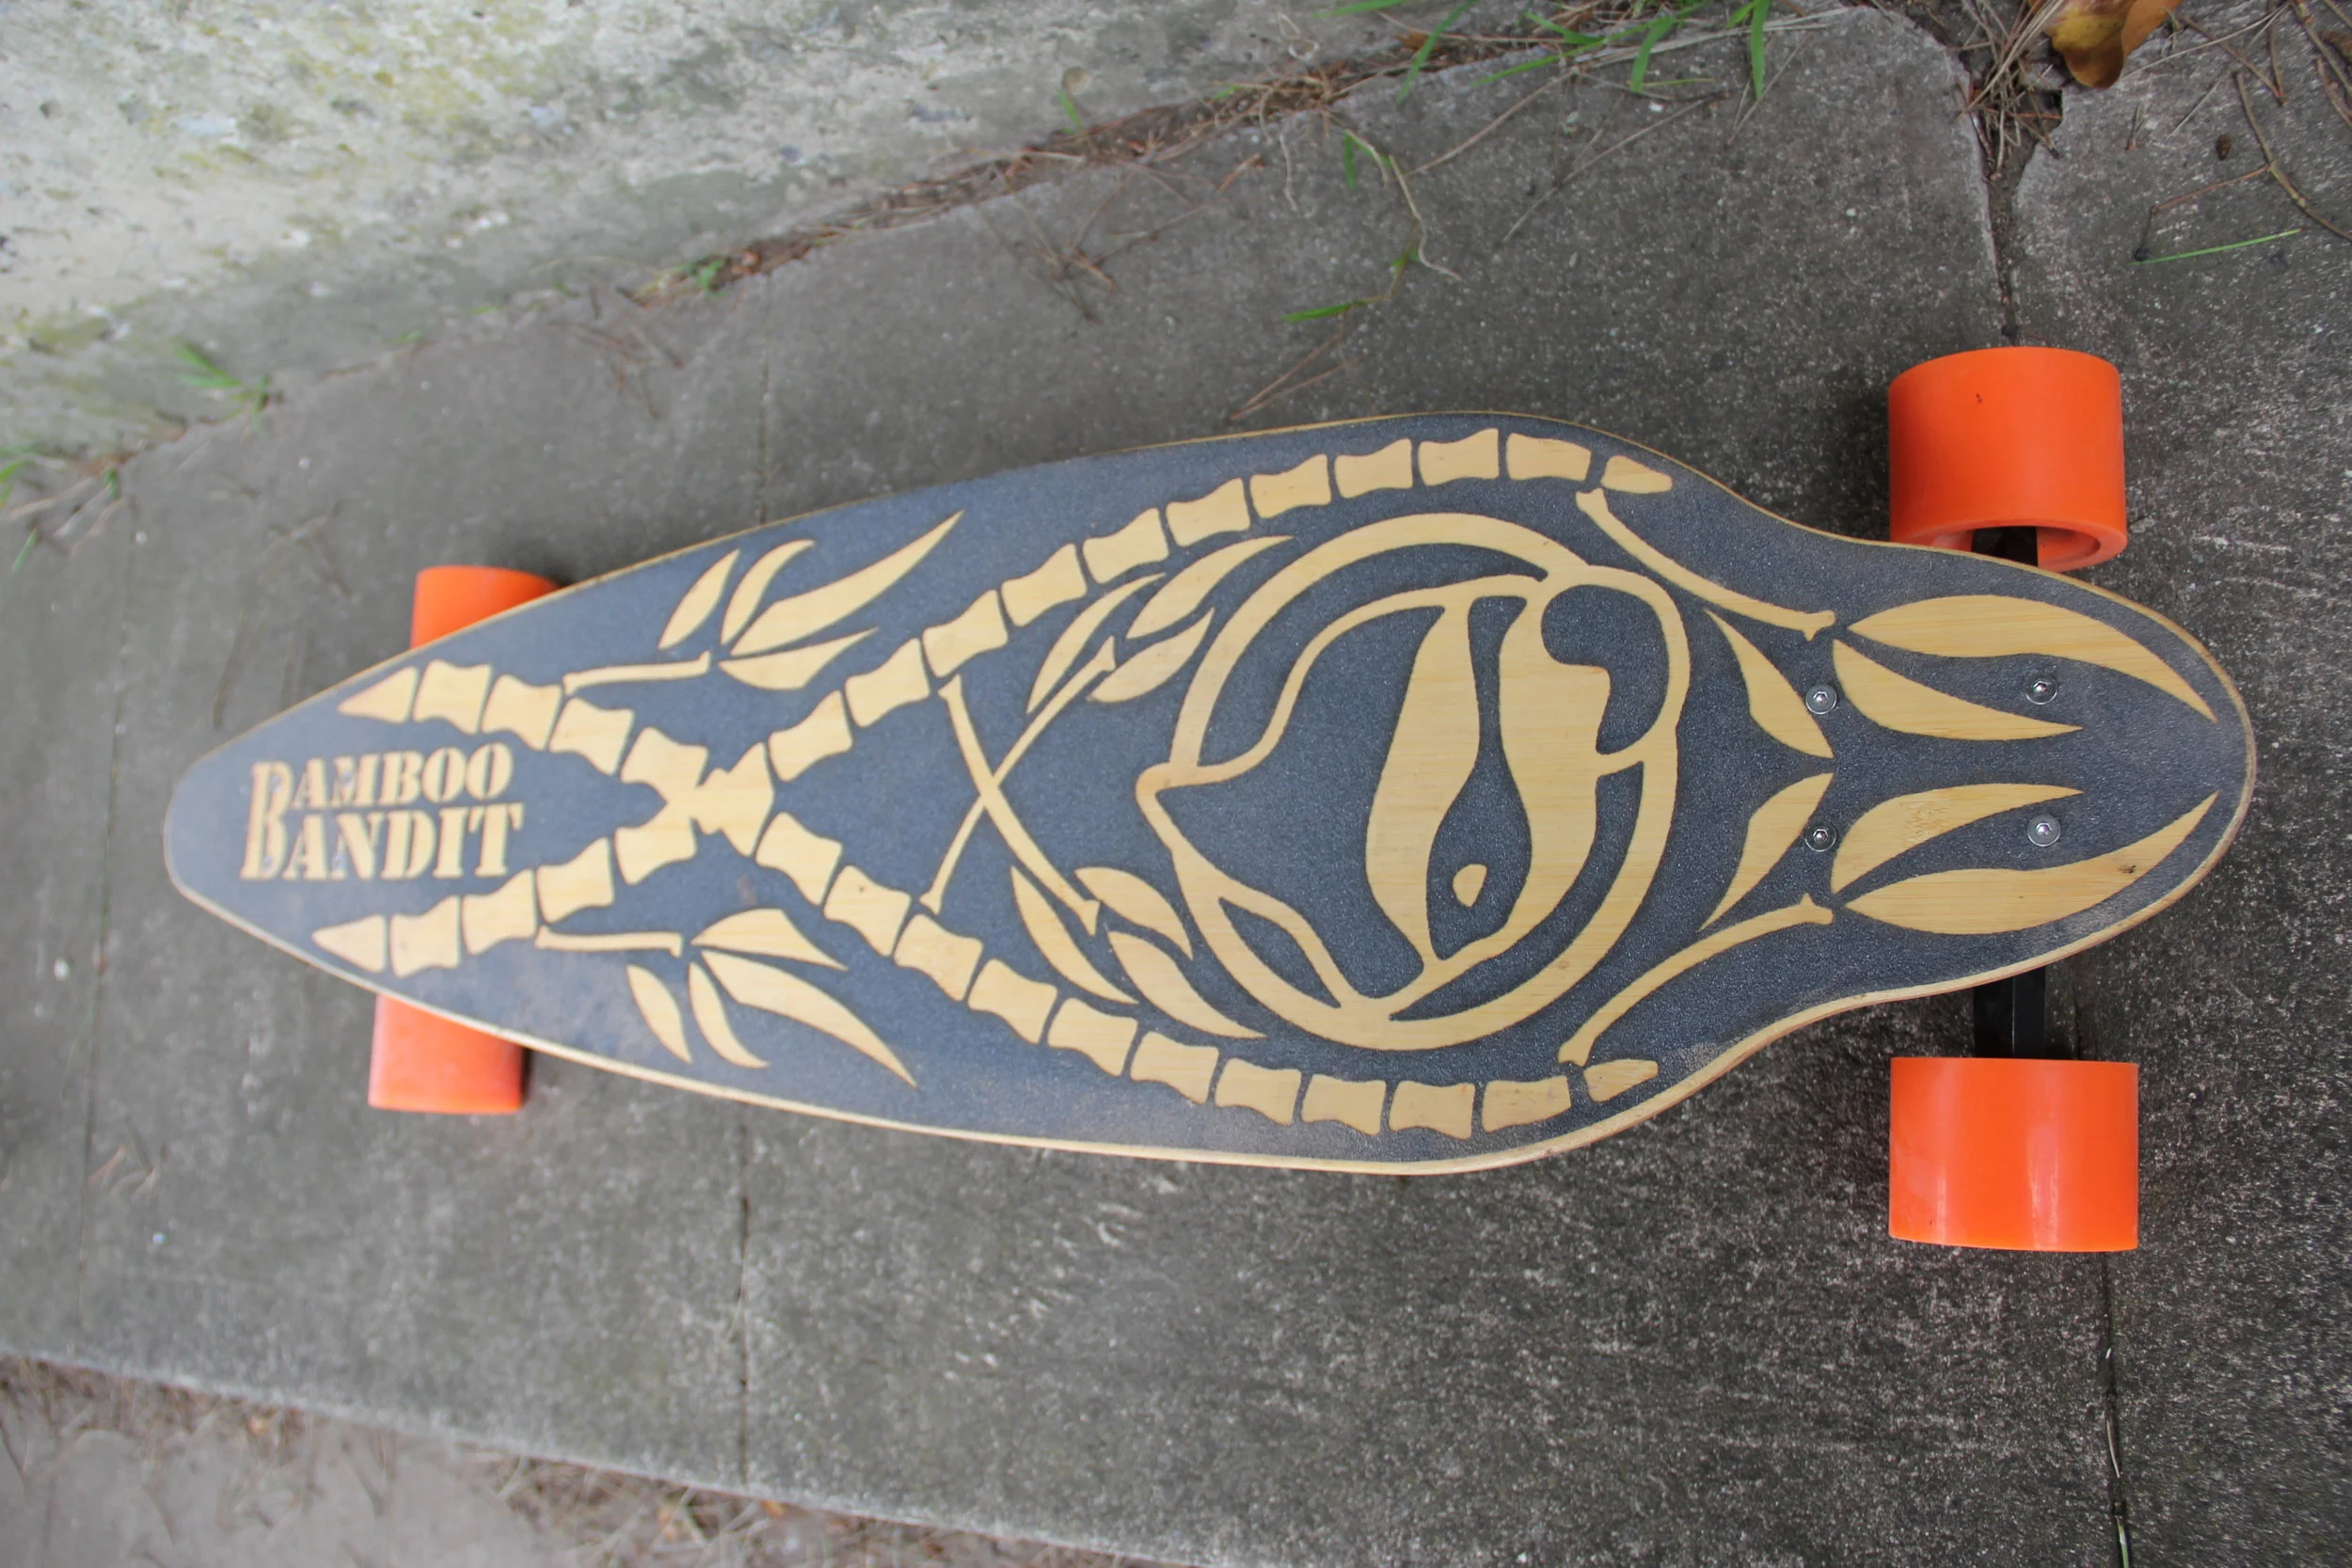
The Deck
A straight forward bamboo ply construction. I experimented with laser cutting the grip tape to add a little flair to the board.

In retrospect, I should have documented this project a little more thoroughly, This is about the best picture I have of the board before the battery housing was installed. The board is made of two pieces of bamboo ply wood, glued together face to face. I then laser cut the profile of the board and the mounting holes. While the board was on the laser I added a decorative engraving. I used a mounted router with an 1/8" round over bit to fillet the bevels of the board and sanded everything smooth. I finished the board with some natural colored stain and several coats of polyurethane spray. The board is around 36 inches long and 10 inches wide. If I were to design it again, I'd only make the board 8.5 inches wide. The 10 inch board was far too heavy and the wide foot patch meant it was hard to estimate the center of the board when riding. Another addition to the board was truck mounting spacers. In order to leave clearance for the motor relative to the back of the board, as well as the battery housing relative to the ground, I had to raise the board 1/2". While this may seem like a small amount, raising the board that high above the king pin pivot made for very sensitive board control (instability). The board was quite prone to speed wobbles at any speed above 10 mph.

I spent a long time, "branding" this board, and eventually came up with the "Bamboo Bandit" concept. Looking back on it now, it seems a little hokey; but, I still think the execution of the laser cut grip tape was pretty good. I used Jessup grip tape and cut it out on the Metabeam Laser at work. Laser cutting grip tape is pretty exciting because when the grit is lasered, it glows brightly and shoots off in all directions; like low budget fireworks.

Grip tape on, wheels mounted and ready to ride. Well, un-powered at least.
Battery Housing and Connectivity
Electric Skateboards need on board power and wireless motor control. After hooking all the electrical systems up, I needed to make a housing to keep them safe and secure.

An electric skateboard needs a power source and a way to control the energized motor. Battery choice was another area where there was myriad options: LiPo vs NiMH, cell count, voltage, discharge constant, energy density, lifetime and volatility. I ended up settling for a 6s LiPo battery because of it's superior energy density (Joules/kgs), its quick discharge rate and its relative low price (~$40). The draw backs of LiPo batteries are that they are prone to off gassing hydrogen if not properly maintained. The gas accumulates in the battery husk and if punctured or the cells within the battery shorted, the battery might catch fire or explode. If you've heard news stories about cell phones or hoverboards catching on fire, it's probably because of a problem with a LiPo battery. I also bought a NiMH, which are more stable, but the diminished voltage didn't give the board enough oopmh.

An electronic speed controller (ESC) is necessary to drive a brushless DC (BLDC) motor. Again, I won't get into details about how it works, but essentially an ESC takes an input from a wireless control source and then modulates current from the batteries to the 3 output terminals. Changing electrical currents + magnets = spinning motor. After some serious research, I chose the Trackstar 150A Gen II, ESC. Its meant for 1/8 scale RC cars, but did a decent job of providing enough burst current to accelerate the board up to speed. To control the Speed Controller I bought an off the shelf trigger remote, which I hold in my hand while riding.

With the battery and ESC picked out, I had to design a housing to mount and protect the electrical system while riding. I water jet a flat pattern and and then bent it into shape on a pan brake. I used blind rivets to fasten the tabs together. I also laser etched the Bamboo Bandit logo into the anodization. I then designed a secondary mount that attached to the board and featured a slide that the housing flanges would slide into. When pushed all the way back, spring tabs on the mount would lock in to housing cutouts, keeping the assembly securely closed.
Glamour Shots

The board complete! I used to ride it to and from work, but eventually switched over to an un-powered board to get a little more exercise. It can get going pretty fast, 20+ mph, and that was with a 6S battery. I can only imagine how this would ride with a 10s and twin motors, which is what I had originally planned for.
All in, the board cost me ~$300. While not nearly as professional as a Boosted Board, it got me to and from work reliably, and left me with an extra $900. Most importantly, I had a lot of fun making it. So yeah. Win, Win.
Lessons Learned:
Speed Controllers and Batteries: The speed controller I used for my board worked, but it wasn't great. It was meant for a large remote control car, and thus didn't have all the features you'd want in a people mover. The reverse was under powered, the acceleration not terribly smooth and it didn't have regenerative breaking. Of course, a lot of the parameters could be tuned (I bought the tuning box and played around for weeks to optimize the settings) but the ESC seemed to be fundamentally limited. If I were to redo the project I would probably use some version of a VESC. (Or the water proof version) VESCs were just becoming big 3 years ago when I made the board and were ~$300 a piece. It started as an open source project by a hobbyist (Ben Vedder/ the V in VESC) who developed these specifically for electric skateboards/ small electric vehicles and was producing them in small batches for people to try out. Seems as though they got the bugs worked out, production up and price down. Some of the big RC companies appear to have adopted his hardware layout and use his VESC modification tool for tuning. It's been a while since Ive been on Endless Sphere, but it seems like everyone is using the VESCs or some variant now. Hobby King has a cheap conversion kit now with Turnigy's version of a VESC. I'd also pair the upgraded ESC with a motor that can take 10-12s lipos (37V+). Battery technology for EVs has improved a lot. Prices are down, the products are more stable and the energy density up. LiFePo4 battey chemistry is becoming popular with electric skateboards and other EVs alike. They feature better recharge properties and appear to pose less of a safety hazard. Their cell voltage isn't quite at LiPo levels but for the other benefits I think it would be worth it to try them out.