Cutlery Set
Knife making has always been an intriguing offshoot of woodworking to me. There is some woodworking involved in the handle, and a solidly crafted hardwood handle can truly turn a knife from a utilitarian blade into an art piece. Still, the majority of the effort, goes into the blade. First, there's the design; material choice,deciding the shape and length of the blade, tang design, balance. Then there's the formed edge; primary bevel style and angle, heat treatment, secondary bevel forming, deburring, honing. Finally, there's the blade finish; facing, polishing, and etching. I've experimented with making knives out of pre-hardened steel before, but the knives were never quite "kitchen" grade. Still, the desire to make a set of high quality, functional, yet aesthetic blades was there. After a year of mulling it over, a co-worker, Vince, and I eventually decided to take the plunge. And thus, the commencement of a two month long, knife making extravaganza. (The individual blade logs can be found here: Cleaver, Chef's Knife, Chef's Knife II, Steak Knife, Paring Knife)
Required Resources: 30 Hours, $125
Materials: AEBL Stainless Steel, Various Hardwoods, 2 part Quick Cure Epoxy, Decorative Handle Pins
Finish: Tung Oil
Tools: Band Saw, Belt Sander, Orbital Sander, Hack Saw, Whetting Stone, Water Jet
New techniques: From Billet To Blade
The goal was to make a set of kitchen knives from scratch; from a billet of stainless steel to a functional and attractive knife.
The Blanks

Locking down the knife design took a lot longer than you'd think. It's easy to stress over the subtle details. Vince and I ended up sketching out a cleaver, a chef's knife, a steak knife, and a paring knife.

Water jetting the knife blanks out of a billet of AEB-L-Stainless Steel. AEB-L is a low (ish) Chromium content steel, common in knife making. AEB-L forms small carbides structures (as opposed to large ones) that make it easy to sharpen but good for edge retention once heat treatment. On this billet, the work piece slipped in the clamps and the first attempt at the cleaver came out a bit deformed.

We tried to maximize the number of knives we could get out of each billet. We used 5 billets and made a total of `17 knives; including one novelty dagger (outline pictures above)..
Sharpening and Heat Treatment
Sharpening the knife was by far the most time intensive aspect of the whole build. The process entailed grinding down the primary bevel to rough out the blade, heat treating the steel to get the appropriate hardness for edge retention and finally using a whetting stone to create the secondary bevel, which gives the knife its sharpness.

Grinding the primary bevel - The primary bevel is the main taper on a knife. I use my belt sander with a 220 grit belt. In reality I probably should have gone with something more aggressive. Proper technique involves grinding the bevel with cutting edge forward and holding your bevel angle constant. For the kitchen knifes I tried to hold 10 degrees for the primary bevel. For the cleaver, the goal was a primary bevel less than 5 degrees. I decided to cut the knives with a double bevel, (distinct from secondary bevel) meaning I put a primary bevel on either side of the knife. Many Japanese knifes are single bevel (chisel cut) and only hold an edge on one side. Double bevel is the traditional style of western blades. This process took approximately 45 minutes per knife, mostly due to the limitations of my belt sander. A professional set up should be able to get a knife done in a couple minutes, although it would be less forgiving of mistakes.

Heat Treatment - Once the primary bevel is cut, the knifes were sent out to Byington Blades, a local heat treating shop. Heat treatment alters the structure of the steel crystals, allowing you to tailor the hardness (and associated brittleness) of the steel to the specific application. For these knives we chose a basic heat treatment option which involved treatment in a vacuum environment, This minimizes decarb, a scale formed when carbon leaches out of the steel and forms pits on the surface. We also specified a minimum of 59 Rockwell hardness and authorized a straightening procedure to fix the induced planar curvature in the knives after heat treatment. There's a rabbit hole you can find yourself travelling down when it comes to heat treatment, with multiple heats, quenching rates and media as well as cryo treatments. We'll see how well these blades hold up, but advanced heat treatment may be something to experiment with in the future.

Secondary Bevel - A knife must only be rough ground (left with a dull edge of ~0.5 mm thickness at the apex) before heat treatment so that the thin edge doesn't develop micro cracks. The secondary bevel is ground into the blade after heat treatment with a whetting stone. The knife is run across (edge forward) a whetting stone at a fixed angle. The secondary bevel is much steeper than the primary bevel. I was shooting for 20 degrees. Proper technique involves traversing the stone with the entire edge of the blade on each pass to ensure an even erosion of a material. There are many different flavors of whetting stone, but mine is a water soaked stone with duel cutting faces; one at 1000 grit for primary material removal and the other at 6000 grit for deburring and honing. This is a rather time intensive process; each knife I made took about 1 hour. Frankly, I could have used another 30 minutes on the 6000 grit side to achieve ultimate sharpness.
Surface Finish and Engraving
Blanks cut, steel hardened, and edges honed. Now, time to make these blades look nice!

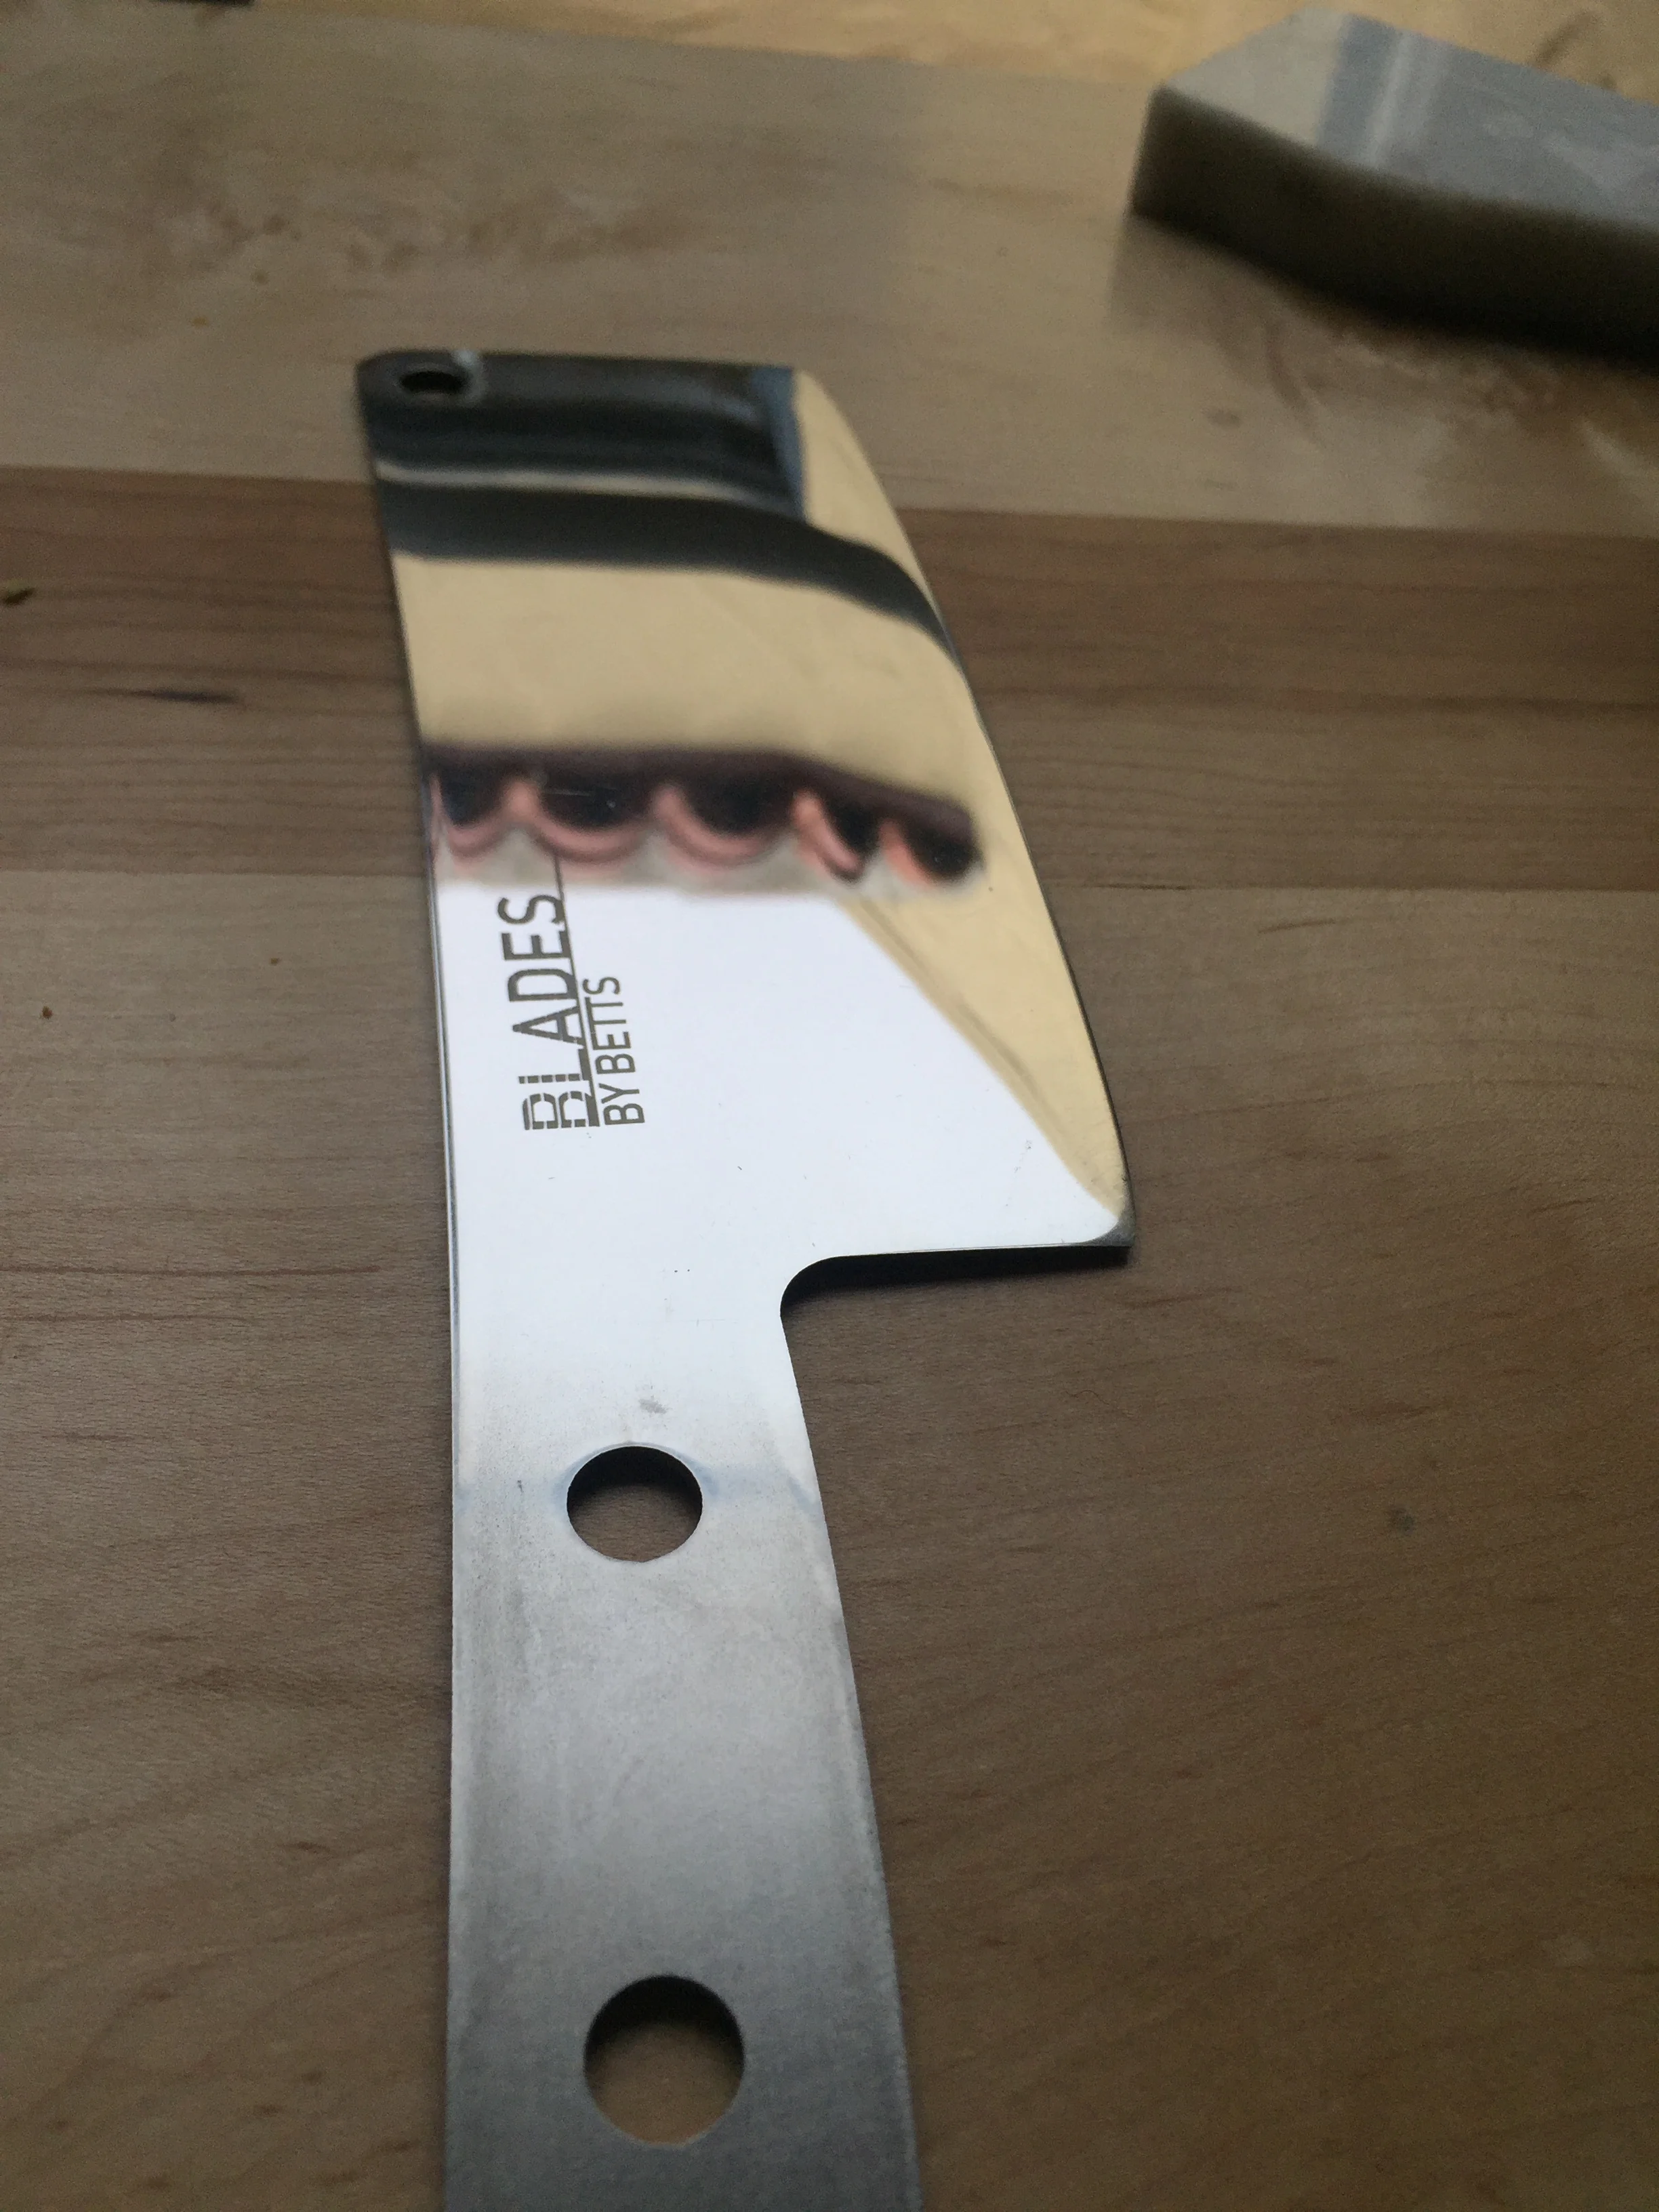
Mirror, Mirror - The blades came back from heat treatment with a grey, blotchy scale. This scale is called decarb and is the build up of carbon diffused to the surface of the metal. The decarb creates pits in the metal which may act as nucleation sites for rust or other corrosion. I used an ordinary orbital sander and progressively finer grit sanding discs to blast away the decarb. I left a few of the knives with a dull finish and only used sanding discs of grits 180 and 320. For 2 of the knives, however, I decided to strive for a mirror finish and used grits 180, 320, 400, 800, 1000, 1500, 2000, and 3000. Since the metal was hardened, the sanding discs wore out incredibly fast. The face of each knife consumed 1 or 2 discs of each grit. In all, I used around 80 sanding discs to finish 6 blades. The final step for the mirror finish knives was to polish with metal polishing compound and polishing wheel attachment for my cordless drill.
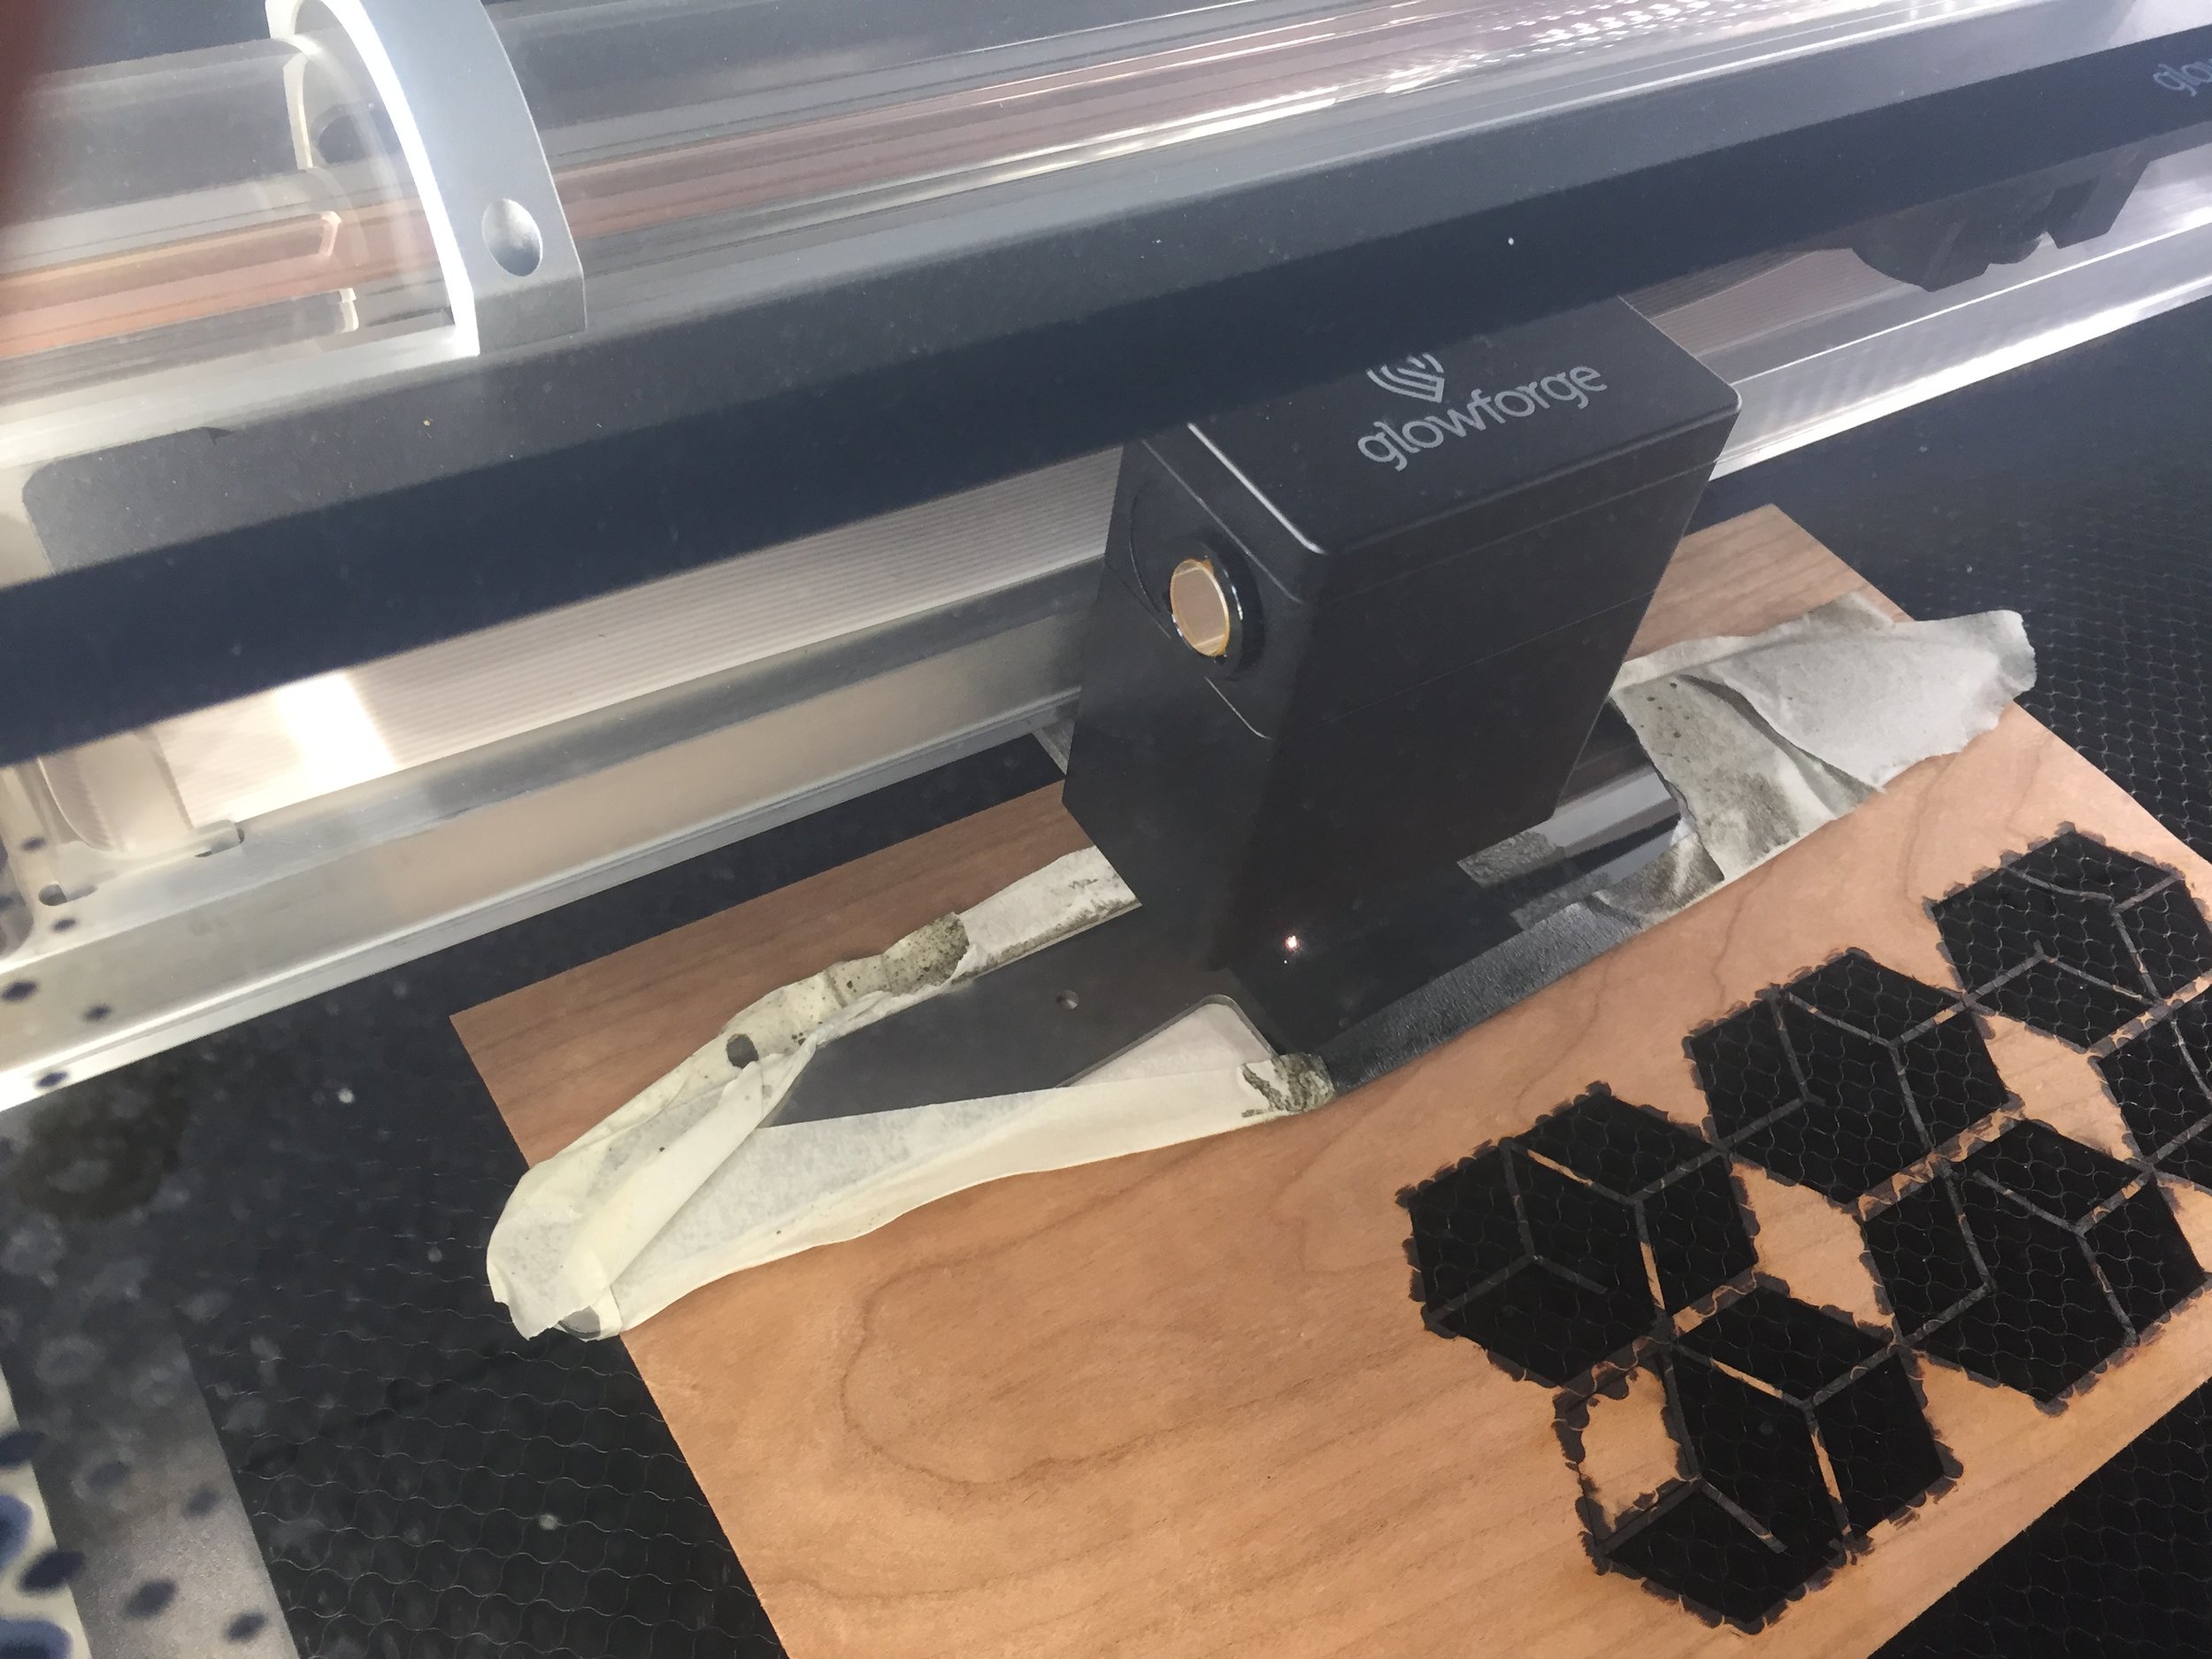
Laser Engraving. - Once the finish had been set on the blades I decided they could use a little embellishment. Low power lasers don't etch on steel very well, but I had heard tell of a compound, Ceremark, that might do the trick. Ceremark can be applied to steel and lasered over to chemically etch a pattern. The problem is, Ceremark cost $100 per aerosol can, a bit beyond what I was willing to spend. Fortunately, a marking alternative exists. Dry Moly Lubricant, which only costs ~$10 for a similar sized can, creates similar markings on steel when lasered. I triple coated a patch of the steel blade, set it in my laser cutter at home, fiddled with some settings and crossed my fingers. After a quick rinse with isopropyl alcohol, the rest of the Moly lube washed off, leaving the crisp logo on the steel. Success!
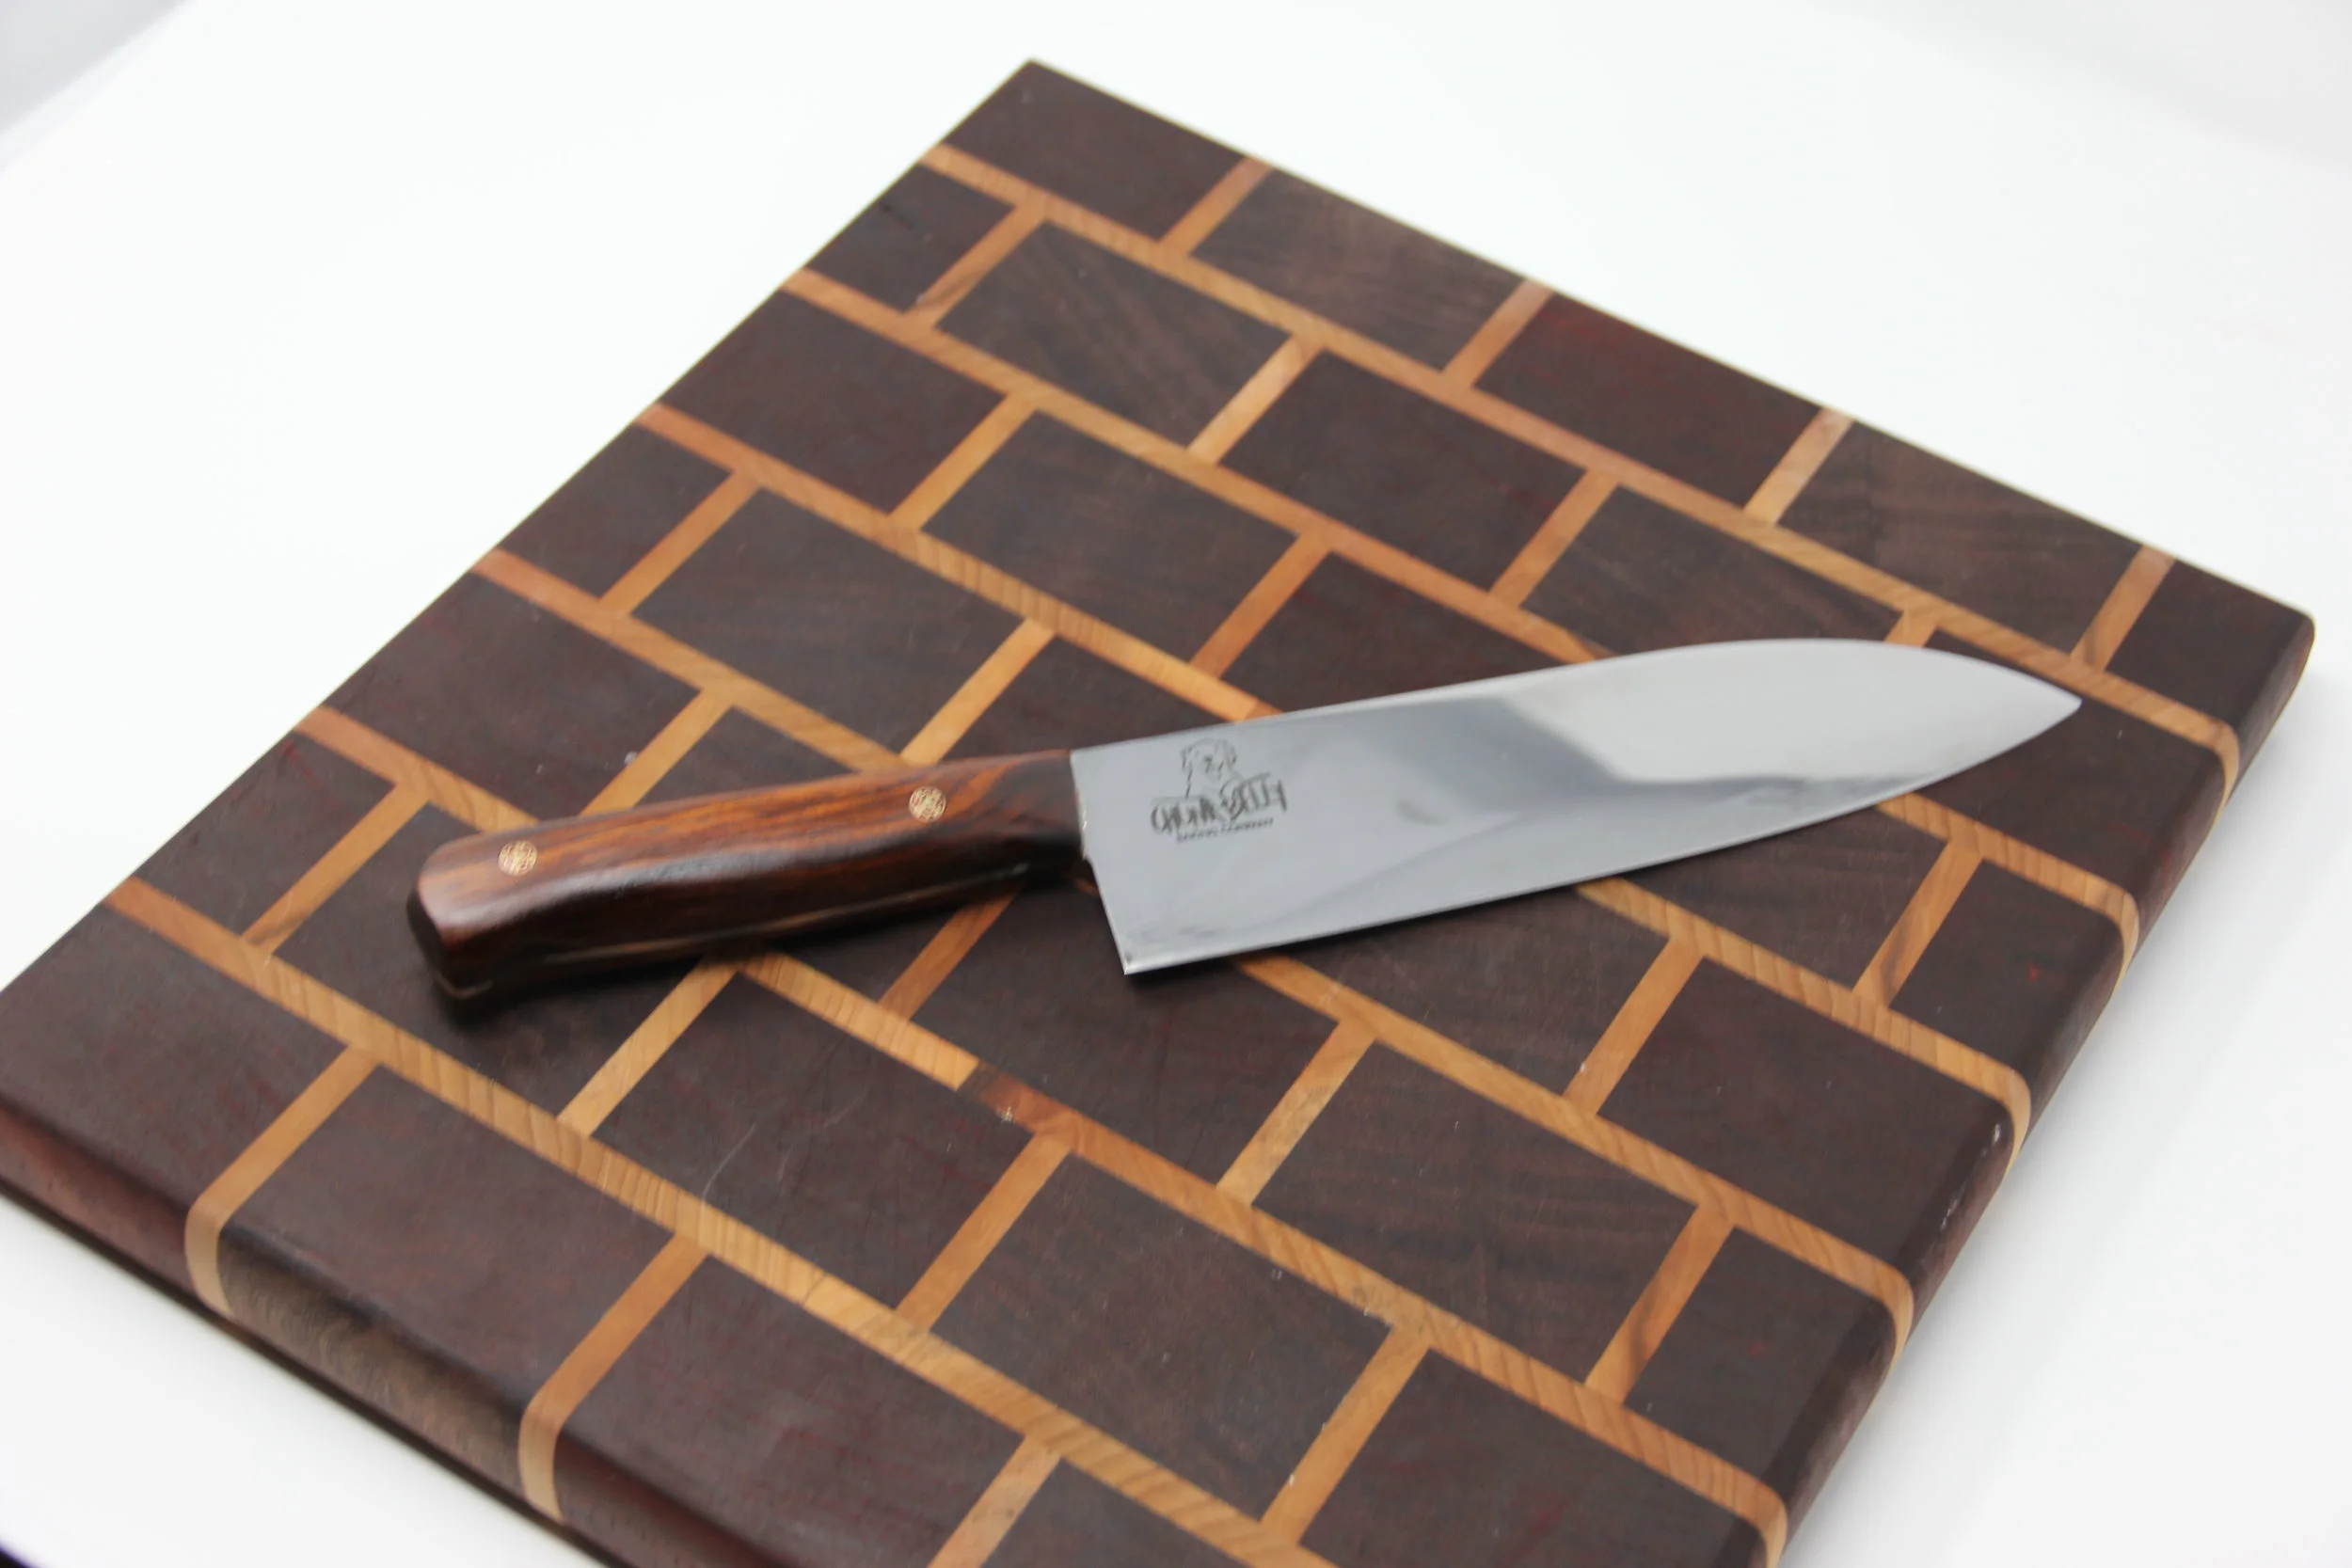
The final look of the blade, complete with logo by Alexa! We also marked one of the kitchen knives with her logo for Chunk Belly Baking Company.
The Handle
Almost there! Adding a handle to complete the build and get to chopping!

The wooden slabs glued to the handle are called the scales. I experimented with a couple different hardwoods for the scales (Cocobolo, Zebrawood, Indian Rosewood and Eucalyptus Burl). I also put decorative pins in the scales to add a little more flair. Traditionally, the pins would be structural, piercing both scales and the knife handle to fasten the assembly together. However, due to a miscalculation (I made the pin holes to small when I water jet the blanks) and the fact that steel was hardened (I destroyed a drill bit trying to open the holes up on the drill press) I had to cut pins stubs to set in the scales. The pins are purely decorative.

Gluing the scales onto the tang. I used a 2 part, quick setting epoxy (5 minute pot life) and clamped everything down with some springs clamps. It was a little tricky because the epoxy acts like a lubricant at first. The scales slide around relative to the knife and it is hard to get everything aligned. About 4 minutes in, the glue starts to get tacky and everything holds a little better. But only 3 minutes after that, the epoxy is set, so you better be confident in your work. Whatever you have at that point is final. It was a little nerve wracking, honestly. After a couple hours, the glue was completely cured and ready for a final shaping.

Finishing the handle is one of my favorite parts of the entire process. First, I used the band saw to rough the shape to the blade tang. Then I clamped the blade in a vise went at the handle with a belt sander. This constitutes the bulk of the material removal. After the coarse grit belt sanding, it was time for the random orbital with increasingly fine grits. By the end, I was up to a 1500 grit pad that has been fully caked, causing the sander to become a burnish tool. On average, it took me about an hour to shape each handle. With the knife essentially complete, it was ready for a coat of Tung oil. Tung oil will be applied every couple days for a month or until all the pits/ grooves from the wood grain have filled in and the handle has polished look.
Glamour Shots


Lessons Learned:
The Over-Zealous Sander: (From: Cocobolo Cleaver ) As I was extremely excited to get started on this particular knife, it was the first knife I took the grinder. And boy, did I go at, grinding down to a fine, extremely sharp edge. I was pretty proud of it until I was talking with the heat treater at Byington Blades about blade prep. He told me to leave the blades rough cut so they didn't develop microcracks during the heating and tempering process. What does, "Rough Cut" mean? After some research on knife making forums, I found that "rough cut" means an edge thickness ~0.5mm. Yeah, I was at about 0.01mm. Back to the belt sander; I had to flatten off the top of the edge to get the thickness back to where it should be. The technique worked, but it did leave the blade edge somewhat misshapen.
A Mirror Finish for Those Who Wait: (From: Chunk Belly Chef's Knife) I don't usually characterize myself as impatient, but after my experience with this knife, it would be disengenuous to deny it. As soon as I cut the primary bevels, I took this knife straight to the orbital sander, and then to polishing. I spent a total of an hour and about 20 sand discs on the effort. This was foolish, because I still had to send it out to heat treatment. When it came back, a blotchy matte grey finish replaced the beautiful mirror finish I sent it out with. Oh well, another 45 minutes of polishing and another 15 sanding discs and the knife was back to its originally luster! But, I still had to cut the secondary bevel. After an hour on the whetting stone I noticed I had made several errant strokes that marred the pristine polished face.... Seriously? Once more! With only fine grit discs this time, I put the final mirror finish on the part. While it was all worth it for the final look of the knife, I sure could have saved myself a lot of time if I had just been patient and thought the process out ahead of time.